My first Idea with a board was to make it modular so I could change things about when I wanted too. But I wanted it to be slightly different than those modular boards that you see out there on other blogs, other sites. Some of the common things which I wanted to avoid;
1. A lot of boards look great, but don't look player friendly. They appear to be built perfectly, like a model in their own right. They astound me with their abilities to do this, but they also don't look player friendly and I would for a game of 40k struggle to ensure my figures were standing and looked in place in such an environment. My board has to be playable but also look good.
2. Although I am prepared to spend the time on the board and the terrain, it has to be modular enough to pack away. I don't have the room to leave it out.
3). It has to be easy enough to replicate across 30 tiles worth of terrain.
So I started with the idea of a sheet of MDF. All good so far. Most boards for 40k are in a standard 6ft x 4ft fashion. I decided on an 8ft variant. The reasons for this are that I wanted a foot on either side for figures and also to put down your coffee. (I am an addict).
I decided to go with it being modular to the point of breaking the board down into three distinct sections, then doing between 5 and 15 plates for each section. The idea is to have 4x2ft sections (4 of these). Then have Mdf based tiles/plates that can sit over the top and be totally modular.
I have decided to leave the board itself to the last thing. As the board will also be double sided. One side will be this Urban Sprawl I am designing while the other is a more arid style environment for both my Tallarns and also my Warhammer forces.
The board layout will be if you were facing it about to play a game as follows.
On the far left is a foot of space painted black. Then you have a single foot of a specific terrain theme. To accomplish this in as modular way as possible for an city scape/sprawl I went with MDF rectangular sections 290mm x 220mm wide. Then I will continue this across the board for approximately 6ft before running off to another black space. 5 of the plates wide will sit between me and my opponent. Giving a small gap of empty space between us and the start of the terrain. The board will be 6 tiles long x 5 tiles wide.
The board itself will go from a light industrial at one end, through the City scape/Temple/Church distrcit at the other with I hope a canal of some type in the mix. (however on further thought to be better modular type element, the canal will be a strait tile length of 5 wide running across the board, but designed so it has two bridges.)
The Church temple area is to be in ruin, while the light industrial area will have shown a lot of recent habitation. At the far end I will do some light argicultural to show the entrance area to the Hive city. (On further thought I have removed the light agricultural and gone with sparser and sparser ruins to again make it more modular friendly)
So I decided to begin with the central district. Why? Well Pegasus Terrain made it the easiest place to start from a terrain purpose as they make such great stuff.
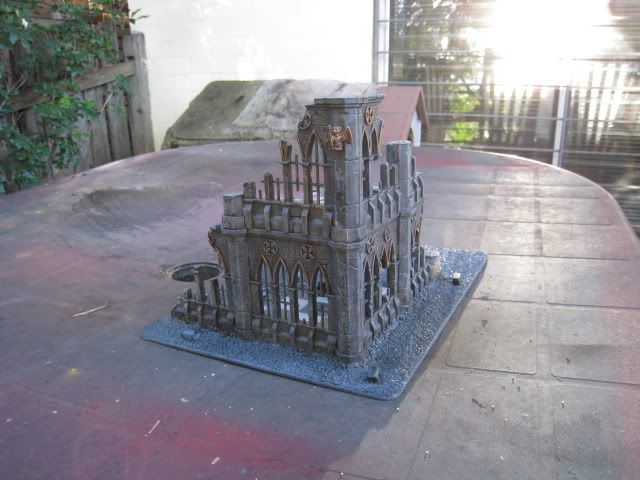
So, I built 5 terrain tiles to begin with. 2 Roads and 2 low walls and 1 ruined building. This how they turned out.

The roads are simple resin tiles glued down and the sides are two different sets of ballast (from sand through to a railway model granular thing) to give the edge where the road hits it, some definition. I then added some bricks again courtesy of Pegasus. (large Grey).


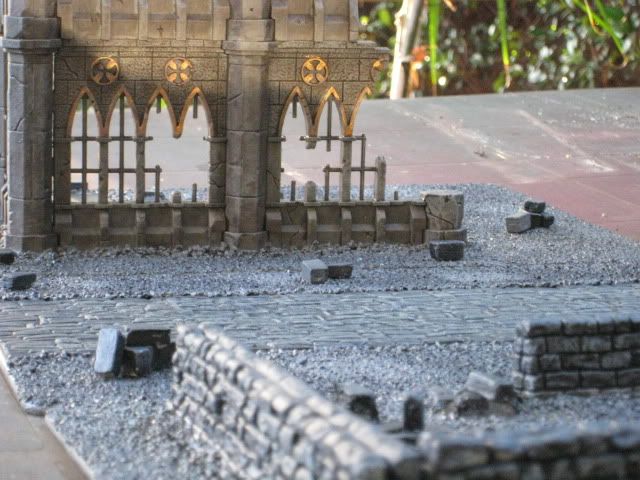
Lastly we have my first building.... a ruined church style corner part. Again pegasus base with my own stuff adding flavor. Card floor tiles etc. Comments appreciated.


My method for doing the building was as follows to get the affect.
A). Preparation and building.
The ruins went together pretty easily, but they needed some work with ensuring they stuck together right and didnt leave large gaps where they join. To get around this as best as I could, I got some model paste (Usually used to build up layers on oil paintings think its called gusso or gesto paste.) Then I added the joiner covers and did a layer of the paste over them to try and obscure most of the gaps.
B). I sat the completed peice down on the MDF and then measured each side of the building itself and cut out a piece of 1mm thick card stock for the bottom tiles. Mine was 7inches by 6 inches. I divided this into squares and inked the lines up and then cut it so my square was done in two parts. I then used a knife to cut along the square tile edges so it would appear that only some of the tiles remained and not a complete square floor. (Using a square also allowed me to get two parts instead of one for another floor on another building).
C). I then glued the floor to the MDF leaving enough room for the wall and more importantly enough room for a 28mm figure to stand on the side looking in. (For practial game purposes).
D). I then glued the building down over the tiles so it sat in the corner with the tiles going about 5mm under the wall. This left a gap looking at the outside of the building (as if it was raised about 1mm off the ground). I again used modeling paste to just fill the gap up completely and then used a large grain of stone all along the edge where the building met the ground. (Secured with about 5mm thick line of PVA glue)
E). I then coated the tiled floor section in denab stone and then colored in the black tiles with chaos black. I also went over the tile joins with a black felt tip pen to give it a straight edge. (The base of the building is now done for tiling work).
F). I then used PVA with a 20mm brush and did the entire surface of the MDF. I then sprinkled sand over the entire thing and left it for about 30mins before coming back and shaking off the excess.
G). I waited 24hrs till I was sure it was dry and then I started to paint it.
Painting
1. Base coat with acrylic grey. (I used simple acrylic color paint for this. That you can pick up at any arts type store. If I had a gun I would have used it, but I used a 25mm brush instead.) It required only two coats, the first covered about everything, the second was to ensure bits that i had missed in crevices etc was done with a smaller 10mm brush.
Then I dry brushed the building over the top with antique white over the grey. Again simple acrylic paint will do. I used a 10mm brush and was fairly heavy handed with it.
2). I got out a size 2 brush and did the gold edging where I wanted it and the gargoyle. I at this time also did the second floor using a similair method to the above mentioned 1 inch floor tiles.
3). I then washed the entire structure including the second story floor with devlin mud. This was the longest and most frustrating part of the process. It is much easier to work in sections so you ensure you get everything. I also think next time I will do this in daylight so I don't miss a spot.
4). I then again lightly drybrushed the entire structure in antique white acylric paint. I was not as heavy handed though this time and I finally touched up any really badly areas I had gone too far over the gold with.
I also super lightly dry brushed up the black floor tiles with the white as it gave them a worn, dusty, gravel trod appearance. The second floor I washed with devlan mud, then went over with denab stone to pick parts out. The wood was snake bite leather I just inked with devlan mund.
The sand base I did in acrylic grey then just dry brushed heavily with a darker grey almost midnight black over the top, to the get the different ground affect and to break it up a bit, I then sponged some of the orginal grey back in a dab type pattern in certain places when it was all dry.
No comments:
Post a Comment